
Choosing a correct toolpath strategy to prevent extraction blockages
For some materials which easily produce strands or large thin wall sections (e.g. plywood or MDF) it is necessary to choose a toolpath strategy to make sure the waste produced does not break away in large chunks or strands. Large chunks or strands could cause a blockage in the extraction system. Extraction blockages can cause the extraction to fail, which can in turn cause the job to fail.
Note that reference to “toolpath strategy” differs from “feeds and speeds”. Toolpath strategy refers to the direction and pattern of the cuts.
This article illustrates symptoms and remedies for
-
Medium-density fibreboard (MDF)
-
Plywood
Medium-density fibreboard (MDF)
MDF is produced from wood fibres broken down from hardwood or softwood residuals. An incorrect toolpath strategy could produce a fibrous thin wall section, which could easily break away from the stock material and block the extraction.
Symptoms
You may witness the following types of cut results when cutting MDF.
Fine chips
This is the ideal result to prevent extraction blockage. You don’t need to change your strategy.

Flakes
Due to the nature of how MDF is produced, the fibres can be pulled away from the stock material. In this case a randomly shaped flake can be produced. This is still a good result, because the extraction system will be able to lift and evacuate these lightweight flakes. Although the cutting strategy is still good and doesn’t need to be changed, it’s worth checking the cutter is still not damaged or blunt.

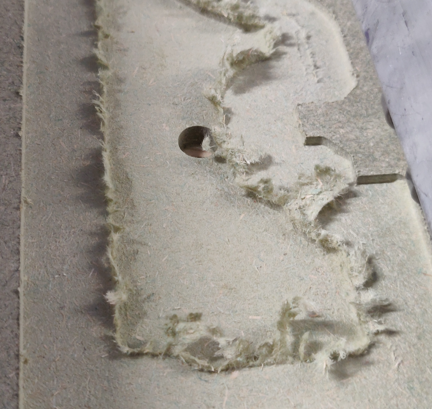
Strands, or thin wall sections
If these occur, this may lead to blocking the extraction. You need to adjust the toolpath strategy you use (see recommendations below).


Toolpath strategy adjustments for MDF
The following adjustments to the cutting strategy can be made to reduce risk of extraction blockage due to large chunks or strands
We will use VCarve Pro settings as an example.
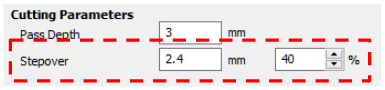
Stepover value
When using the offset type of passes for your pocket toolpath, make sure the stepover cutting parameter of the tool used is not set to a value smaller than 40%. If the stepover is too small, the cutter can knock any thin wall sections left after the previous passes off the stock material instead of cutting into them. We recommend using a value of 40-50% of cutter diameter.

Pocket toolpath type
If the stepover value is already set to the recommended 40-50%, then we recommend changing the pocket toolpath type to be raster.

Depending on the pocket type you can adjust the angle of the raster passes to be such that you either don’t have any thin wall sections or strands at all, or they are very short and can go through the openings in the extraction channels. The idea is to allow the cutter to cut into the material which is still well supported by the rest of the stock and prevent the creation of thin walls.
In our example we set the raster angle to 0 degrees.

The adjusted strategy may still lead to a long strand occurring in the selected region. We need to change the orientation of the passes.

We adjusted the raster angle to be 90 degrees.

The adjusted strategy will create a pocket without any tool retraction during the roughing pass, hence creating no thin walls. The contour of the pocket will then be finished with a profile pass.

Then we adjusted the raster angle to 45 degrees.

This created a pocket toolpath looking like this. There will be some areas where thin walls will be created, but the length of them will be short enough to fit through the extraction system.

Finishing pass
The above pocket toolpath strategies will create a straight line roughing witness marks at the bottom of the pocket. If required, you can adjust the depth of the roughing passes to a value, which will leave 0.3-0.5 mm for a finishing pass. Then the finishing pass can be done using the offset type of the pocket toolpath. At this point the cutter will produce chips or flakes, which can be easily managed by the extraction.
Plywood
Plywood is a material manufactured from thin layers or "plies" of wood veneer. The plies are glued together with adjacent layers having their wood grain rotated up to 90 degrees to one another.
Symptoms
You may witness the following types of cut results when cutting plywood.
Fine chips
This is the ideal result and you don’t need to change your strategies.

Small chunks
When cutting thin walls across the grain of the plies, the cutter may knock chunks of material. This is still a good result, as long as the chunks are small enough. The extraction system will be able to lift and evacuate these lightweight chunks. The cutting strategy is still good and doesn’t need to be changed.

Strands, thin wall sections and strings
When cutting along the grain of the plies, strands, thin walls or strings can occur. These may block the extraction. You need to adjust the toolpath strategy you use (see recommendations below).

Toolpath strategy adjustments for plywood
Stepover value
As with MDF, when using the offset type of passes for your pocket toolpath, make sure the stepover cutting parameter of the tool used is not set to a value smaller than 40%. If the stepover is too small, the cutter can knock any thin wall sections left after the previous passes off the stock material instead of cutting into them, or produce very long strings of material. We recommend using a value of 40-50% of cutter diameter.


Pocket toolpath type
If the stepover value is already set to the recommended 40-50%, then we recommend changing the pocket toolpath type to be raster.
Follow the guidance for MDF (above) and adjust the raster angle to such a value that you achieve cutting across the grain of the plies. For example, with a plywood made of plies rotated 90 degrees to one another, you can use a 45 degrees raster angle to achieve cutting across grain through the whole thickness of your material.
If you are using a more expensive material where the plies are rotated at 45 degrees you may need to adjust the raster angle depending on the depth of the cut.
|
|
When cutting pockets, you may need to cut across the grains of the plies. |

Finishing pass
The above pocket toolpath strategies will create a straight line roughing witness marks at the bottom of the pocket. If required, you can adjust the depth of the roughing passes to a value, which will leave 0.3-0.5 mm for a finishing pass. Then the finishing pass can be done using the offset type of the pocket toolpath. At this point the cutter will produce chips or flakes, which can be easily managed by the extraction.