
Setting SmartBench’s working datum in the Z axis
You will need to set the position of SmartBench’s working datum in the XY plane and the Z axis separately.
|
|
Once you have set SmartBench’s working datum in the X, Y, or Z axis, SmartBench will remember the position on that axis until you change it. You can move SmartBench away from the position of its working datum without needing to reset it again before starting a job. |

Preparing to set SmartBench’s working datum
You will need to know what a datum is, and how to home and move SmartBench before you can set SmartBench’s working datum.
Click here to learn more about what a datum is. Click here to learn more about manual moves. Click here to learn more about homing SmartBench.
In the console menu, click on the “Pro” App.

If SmartBench is not homed already, home SmartBench now.
|
|
Setting SmartBench’s working datum without homing first could cause the job to run in a place you did not expect, and cause damage to the workpiece. |


Click on the manual move tab on the left hand side of the Console screen.

Use the manual move buttons on the Console to position SmartBench above the surface (e.g. the spoilboard) that you want to use as the reference for the Z axis position of SmartBench’s working datum.
|
|
When you position SmartBench’s working datum in the Z axis, you do not need to worry about SmartBench repositioning its working datum in the XY plane. |


A: Target datum position


There are two ways to position SmartBench’s datum in the Z axis:
Using manual moves to set SmartBench’s working datum in the Z axis
Using the manual move buttons, move SmartBench in the Z axis to your desired position for SmartBench’s working datum position. Click here to learn more about manual moves.

Lower the Z axis until the tip of the tool touches the work surface.

Press the SET datum button on the bottom right of the console screen to set the position of the working datum in the Z axis.

Using the probe plate to set SmartBench’s working datum in the Z axis
SmartBench’s working datum can be set automatically using the Z probe plate, which SmartBench will use to find the surface of the material.
Before using the probe plate, you may want to toggle the speed to high and use the manual move buttons to move SmartBench along the Z axis, closer to the material surface.
Click here to learn more about manual moves.

Remove the Z probe plate from the back of the Z head, and place it underneath the tool tip.

Ensure that the tool tip is over the centre of the probe plate.

Press the Z Probe button on the right hand side of the console screen.
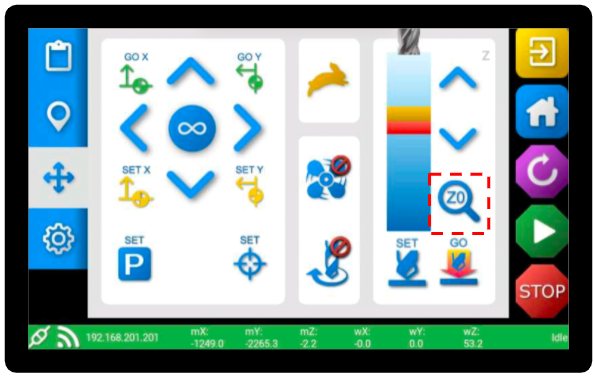
SmartBench will automatically detect when the tooltip has touched the Z probe plate, and set its working datum.
When SmartBench’s working datum has been repositioned and set successfully, you will see the red and yellow cut zone moves to where the tool is in the virtual tool image on the console screen.
The yellow box represents the tool retract height, and the red box represents the depth of the cut.
A: Tool retract height.
B: Depth of cut.

Checking the working datum position
You can check the working datum position, and make sure that the job file is within SmartBench’s workspace by looking at the graphic next to the Z move buttons on the Console. When you have set the datum, you will see the red and yellow cut zone move to where the tool is in the virtual tool graphic.
The line at which the red and yellow boxes meet represent the height of the Z working datum (also referred to as Z0).
The yellow box represents the tool retract height (moves above Z0), and the red box represents the depth of the cut (moves below Z0).
A: Tool retract height.
B: Depth of cut.
